-
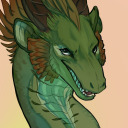
I’m really digging how nice my new pattern is turning out. Next step is handsewing the paw pads and sorting out the lining.
-
Testing out my new slim feetpaw pattern. These are all the pieces for a set of lemon & navy paws. I have no need for these so they will be sold upon completion.
-
FURSUIT TIP! Claw cuticles are pretty easy to do. You just cut the end of your claw pattern to the length of your cuticle & cut 2 for each side. Sew all the side seams then pin inverted onto the stuffed claw where the cuticle starts & sew down. Flip the cuticle down then attach…
-
Made up some crochet doorstops for some autumn spoopy season vibes (in Aussie spring) 🍂 🎃 Aren’t they just adorable!
-
Painted up a few more figures during the #SydneyLockdown. First is a windstone kitsune painted to look like an amber marbled fox. Next up are two Churches by Homemade Horrors painted using swamp lemur and poison dart frog inspo respectively.
-
FURSUIT TIP! Thought I’d share how I do paw finger escapes. I sew large button holes to one side of the lining before sewing all the lining together. After stitching the lining to the paw, I then blanket stitch the button hole to the fur. This makes it much cleaner and prevents the escapes fraying…
-
I went a bit crazy on webbing reinforcing as I really don’t want the tail sleeve to pull/rip/warp when I attach to the lumbar belt. With all this reinforcement on the weight-bearing seams and pieces, I am confident most sources of failure will be mitigated.
-
I didn’t like the pattern I use for slim feetpaws and wanted to update it but it was way down my to do list. Thankfully a lovely commissioner gave me reign to do it as precursor to their commission. The silliest part of this process is taping your own foot then having a random foot…
-
Down to the final segments. These are reinforced with interfacing on the top, sides, and collars which are the weight-bearing surfaces and will have webbing sewn down them to support belt attachment. Thinking of going back to put interfacing on the tops of segments 4 and 5 as well so that I can extend that…
-
Homeward stretch of the bonetail. The last 2 sections have to be completed separately as I need to reinforce them in the machine before connecting to the main sleeve. Here you can see the side seam to close, and pins marking a shaping dart to be sew into each spine.