-
Success with the plug! It fit perfectly and there’s still an appropriate amount of give for movement & padding. Bonus is the zip tape width lines up perfectly with the plug edge & zip tooth placement line; so my plan is to hand stitch the edge of the tape then machine lightning stitch to the…
-
Finally finished altering the bone tail! This was absolute HELL of an alteration as the belt kept getting in the way of machining the zipper, whilst the extra fabric from the zip tape made it extremely difficult to pass the needle through when closing. And lets not forget I had to resew the interior straps…
-
The sleeping bag zip miwaks bodysuit maker found for me unfortunately proved unreliable when I stress tested it with the actual tail. I spent time last year hunting down YKK continuous zip tape & fittings to custom a length, which involved carefully removing teeth from the tape. Then I removed the tail sheath, whip stitched…
-
Since receiving my bodysuit I’ve been wracking my brains for how best to install the tail zip, since upon closer inspection & despite excellent communication with the suit maker, the tail port circumferance is 9cm too long (aka was cut oversized compared to info/replica tail base I provided). The best & easiest solution I could…
-
Miwak is now spooky season ready!
-
WIPs of the process of foam clay sculpting Miwaks skull hat, this time in mini! Still have to smooth some parts, but have to wait for my small sized dremal mandrel to arrive. Doll by @homemadehorrors
-
Spring has sprung here in Australia! Isn’t it just glorious when the flowers start blooming and the days start getting warmer.
-
Miwak wanted to show off his 2 new vests. Both vests are completely reversible to allow for 4 different style! (doll & vest pattern by @homemadehorrors)
-
Finally completed Miwaks skull hat! My aim was to make it as light as possible, & given the materials used I think that 0.5g is pretty darn good! Just have to do a few last edits on the head and suit, & then the big reveal!
-
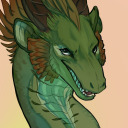
Base airbrushing is completed. Next step is to handbrush in some select dark details, perhaps hit some specific highlights with the airbrush, and put in the felt liner.