-
We’re ready for gluing. But oh boy, that fro!
-
For extra security of the knotted hair, I painted 2 thin layers of PVA glue over the back of each knot to create a flexible plastic coating. Then I had to back the wig onto some cotton (after bullying the wig back into shape) using a back stitch and lines of tack stitching to keep…
-
Miwak is coming along fantastically! I’m not going to glue anything down until I’ve finished the kanekalon mane as I’m not sure whether I will have to adjust anything.
-
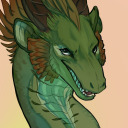
Miwak’s finished face, although right now I think it looks more like a luchador mask. All handsewn and preshaved, although I might have to do some more preshaving around the eyes before it heads over to the mask.
-
Started sewing up Miwak’s hood. There were a few minor adjustments to the ear pattern but so far I’m please with how it’s looking.
-
First pieces for Miwak’s hood. Decided this time I would only cut pieces matching the section I’m sewing, so I don’t drown in pieces. So far I’m feeling that this project is manageable.
-
Please enjoy this time lapse of the making of Miwak’s paws. Over 13 hours compressed into about 2 minutes.
-
Feetpaw progress! I’ve set the claws and sewn on one foot bottom. Have to finish up the other one and sew in the lining on both. Sooo close to being finished!
-
Miwak’s tail is complete! Final weigh in is 2.3kg but it doesn’t feel like it when worn.
-
Appliqué beanz have never really appealed to me as nowhere in nature do you see animals walking around with little seam lines on their feet pads. So I choose to handsew beans onto feetpaw bottoms as I like the nice, clean, realistic edge. It’s a bit more work but worth it!